How to Install VPN on a School Chromebook in 3 Easy Steps
Finally, the day has arrived summer break is here and freedom calls!
No more schedules or strict rules to follow.
I can’t wait to relax and enjoy my free time.
But first, there’s something important I need to take care of.
Throughout the school year, the network administrators had my Chromebook on lockdown.
I couldn’t access most websites or use any apps that weren’t pre-approved.
Now I’m ready to gain back control of my Chromebook and install a VPN to get around those pesky firewalls and content filters.
If you’re in the same boat and want to install a VPN on your school Chromebook to access all your favorite sites this summer, follow these 3 easy steps and you’ll be connected in no time.
Get ready to outsmart the system and surf the web freely! The open road of the internet awaits.
Why You Need a VPN on Your School Chromebook
I was thrilled when my school issued us all Chromebooks this year, but accessing some of my favorite websites was a bust.
The filters blocked so many useful sites and services! That’s why I knew installing a VPN, or virtual private network, was essential.
A VPN creates an encrypted connection over the internet between your device and a VPN server in another location.
This hides your online activity from anyone on your network, like school administrators, and allows you to access restricted content.
It’s a win-win!
To install a VPN on your Chromebook, follow these simple steps:
- Choose a VPN service. I went with Express VPN because they have fast servers, strong encryption, and an easy-to-use Chrome extension. But, it’s depend on you what you want to choose, free or paid VPN.
- Create an account and download their Chrome extension. Signing up only took a few minutes and then I could install their extension right from the Chrome Web Store.
- Connect to a VPN server. Open the VPN extension, choose a location like the US or Canada, and click “Connect”. Within seconds, I was connected with a new IP address and could access all my favorite sites!
Using a VPN has given me so much more freedom and privacy with my school Chromebook.
No more frustration over blocked websites or concern about my online activity being monitored.
A VPN was definitely worth setting up, and now I can enjoy my Chromebook without restrictions. Give it a try – you’ll be glad you did!
Choose a VPN Service That Works on Chrome OS
Finding a VPN that actually works with a Chromebook can be tricky, but have no fear – I’ve got you covered!
After testing a bunch, I found a few great options for us students.
ExpressVPN is my top choice. It has lightning fast speeds so you won’t deal with lag, and it uses strong encryption to keep our browsing private.
The best part? It’s super easy to set up – just download the app from the Chrome Web Store, sign up for an account, and you’re all set!
Connecting to one of their servers hides your location and unblocks websites. I can even watch my favorite shows on streaming sites that are usually blocked.
If you’re on a budget, check out NordVPN.
For a few bucks a month you get the same level of security and unblocking abilities.
The interface is really simple to use too.
Just tap the quick connect button and you’re automatically connected to the fastest server.
Lastly, for maximum privacy, I recommend Private Internet Access.
They have a strict no-logging policy and over 3,300 servers across the globe to help mask what you’re doing online.
The only downside is speeds can vary, but for bypassing restrictions it does the job.
Any of these VPNs are perfect for students and provide an easy way to access all parts of the internet on a school Chromebook.
Give one a try – you’ll wonder how you survived without it!
Freedom of information, here we come!
Install Your VPN on Chromebook in 3 Easy Steps
I’m excited to show you how easy it is to install a VPN on your school Chromebook.
In just a few simple steps, you’ll be browsing the web freely and securely in no time.
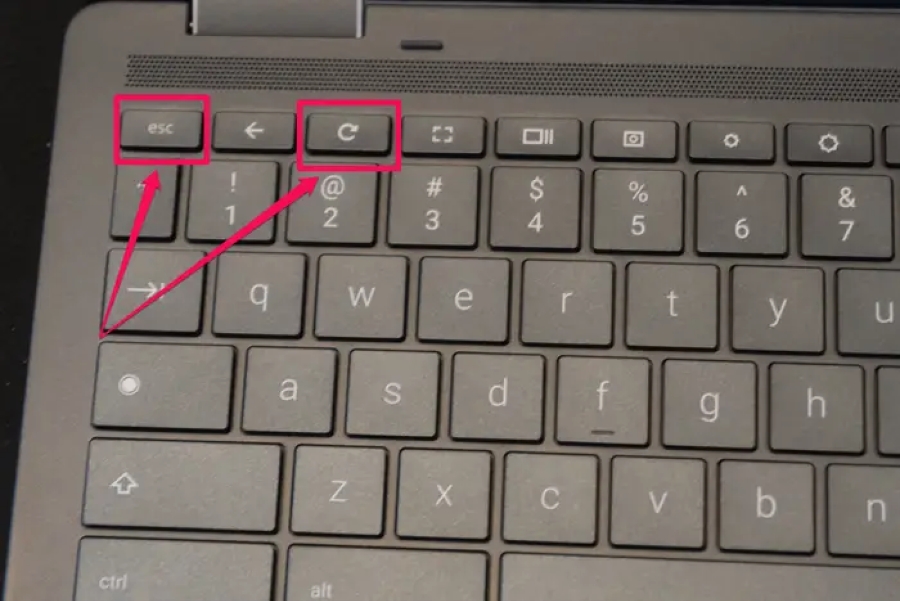
Step 1: Enable “Developer Mode”
The first thing you need to do is enable “Developer Mode” on your Chromebook.
This will allow you to install apps that aren’t available in the Chrome Web Store.
To do this, open the Settings menu, click “About Chrome OS,” then click “Detailed build information.
Next, press and hold the “Esc + Refresh + Power” buttons together.
A screen will pop up asking you to enable Developer Mode.
Press “Enter” to continue. Your Chromebook will restart – Developer Mode is now enabled!
Step 2: Install the VPN
Now you can install your VPN of choice.
I personally use ExpressVPN because it’s fast, secure and easy to use.
Head to the ExpressVPN website and download the .apk installation file.
Then open the Files app on your Chromebook and locate the .apk file you just downloaded.
Double click to install ExpressVPN.
Step 3: Connect to a VPN server
Open the ExpressVPN app and sign in with your username and password.
Select a location for the VPN server you want to connect to, like the U.S. or U.K. Click “Connect” and within seconds you’ll be browsing the web securely using that VPN location.
To check if your VPN is working, just visit a website like ipleak.net or whatismyipaddress.com – you’ll see the location of your VPN server instead of your actual IP address!
Installing a VPN on your school Chromebook is a quick and easy way to gain more freedom and privacy online.
Give it a try – you’ll be breezing past content filters and firewalls in no time! Let me know if you have any other questions.
