How to Use NordVPN: A Step-by-Step Tutorial
As someone who enjoys the occasional bout of online privacy, I’ve become quite the connoisseur of virtual private networks or VPNs.
After trying many of the usual suspects, I’ve found NordVPN to deliver the best blend of security, speed, and usability.
While some people may find setting up a VPN as exciting as doing their taxes, I’m here to show you that getting started with NordVPN is actually quite painless.
In a few simple steps, you’ll be surfing the web in sweet, sweet anonymity and wondering why you didn’t start using a VPN sooner.
So grab yourself a refreshing beverage, put on some mood music, and let’s dive in to the wonderful world of NordVPN.
Your internet freedom awaits!
Downloading and Installing the NordVPN App
To cloak my online shenanigans from prying eyes, I turned to NordVPN.
Downloading their app was simple enough, even for a tech-challenged soul like myself.
Once I created my account, the app installation took all of 30 seconds.
No muss, no fuss. The sleek interface is self-explanatory, with big obvious buttons to connect and disconnect.
None of that command line nonsense required.
When connecting, NordVPN offers thousands of servers in 60+ countries to choose from.
Whether I want to stream geo-blocked content or just ensure my bank info stays private, there’s a server for the job.
I can even filter locations by categories like streaming, torrenting, and security.
To get started, just tap “Quick Connect” and NordVPN will automatically select the ideal server based on my needs.
Or, if I’m feeling choosey, I can pick a specific country or city from the list.
Either way, NordVPN handles the encryption details so I don’t have to think about it.
Once connected, the NordVPN icon on my desktop lets me know my snoop-proof connection is active.
My real IP address is hidden, my data is encrypted, and I’m free to browse as anonymously as I please.
When I’m done, one click disconnects and I’m back to my unsecured network.
Overall, NordVPN makes it simple to keep my online activities private without requiring an advanced degree in network security.
For staying under the radar, NordVPN has become my cloak of invisibility.
Connecting to a VPN Server
So you’ve signed up for NordVPN and are ready to mask your online identity.
Let me walk you through connecting to one of their secure servers.
First, launch the NordVPN app on your device.
You’ll see a big ol’ map with all the countries where NordVPN operates.
Pick a server location that suits your needs.
Want to access geo-blocked content?
Choose a server in that country.
Value privacy above all else?
Iceland and Panama don’t keep logs.
Can’t decide? The “Quick Connect” feature will choose a fast, available server for you.
Once you’ve selected a location, just click “Connect”.
Within a few seconds, NordVPN will securely connect you to their server.
You’ll see a notification letting you know you’re protected.
Now you can surf the web freely and anonymously.
Your real IP address and location are hidden, replaced by the server’s address.
All your internet traffic is encrypted, so nosy wifi networks or ISPs can’t see what sites you visit or files you download.
If at any point you want to disconnect from the VPN, just click the “Disconnect” button.
But why would you ever want to do that?
Masking your digital footprint is terribly entertaining.
With NordVPN, you can indulge your inner troublemaker and cause all sorts of anonymous mischief online.
Changing Your NordVPN Settings
Let’s be honest, VPN settings aren’t exactly riveting reading.
I’d rather be watching cat videos or learning how to make sourdough bread.
But alas, to enjoy all the privacy and security benefits of NordVPN, some configuration is required.
The good news is, NordVPN’s settings are pretty straightforward.
Once you’ve installed the app, you’ll want to dive into the settings to make sure it’s tailored to your needs. A few things I always adjust:
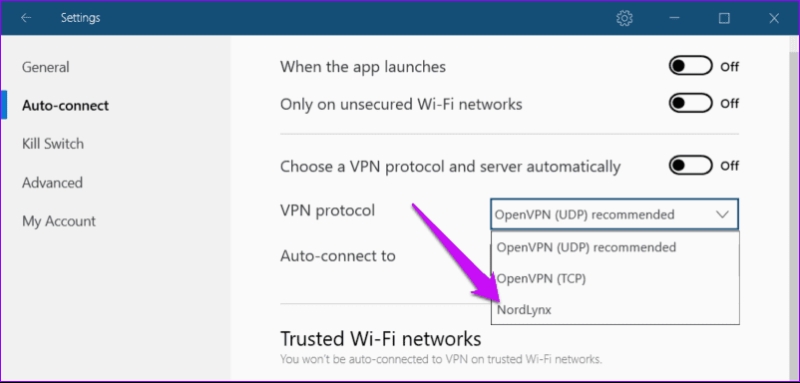
Protocols
NordVPN lets you choose between NordLynx, OpenVPN, and IKEv2 security protocols.
I go with NordLynx since it’s designed for high speeds.
Your mileage may vary, so test each to find your favorite.
Kill Switch
This handy feature blocks all internet traffic if your VPN connection drops to avoid exposing your data or IP address.
Enable that kill switch, pronto!
CyberSec
NordVPN’s ad blocking feature can weed out annoying ads, trackers, and malware.
I keep CyberSec on 24/7 for a faster, less irritating browsing experience.
Auto-connect options
If you want NordVPN to launch automatically when you start your device or connect to insecure Wi-Fi networks, enable these auto-connect options.
One less thing to remember, am I right?
Additional features
NordVPN has a few other bells and whistles like DNS leak protection, IPv6 leak protection, and a VPN firewall.
I enable them all for maximum security, but some features may impact your connection speed or functionality on certain sites.
Test and tweak to your heart’s content!
I hope this brief foray into the wild world of NordVPN settings was at least mildly entertaining.
Time to get back to those cat videos—privacy and security configured, of course!
