As internet privacy and security concerns continue to grow, Android users are increasingly turning to Private DNS as a solution. Android Private DNS offers improved encryption and protection from tracking, making it an attractive alternative to standard DNS on Android devices.
In this article, we’ll explore what Android Private DNS is and how to activate it on your device. We’ll also discuss best practices for optimizing your Private DNS settings and troubleshoot common issues that may arise.
Whether you’re a seasoned tech user or a beginner, this guide will provide all the information you need to get started with Android Private DNS. So let’s dive in and explore this powerful tool for enhancing online privacy and security.
Keep reading to learn how to activate Android Private DNS on your device and protect your internet activity from prying eyes.
Table of Contents
ToggleUnderstanding Android Private DNS

Android Private DNS utilizes advanced encryption methods to enhance privacy and security on Android devices. A notable feature of Private DNS is the DNS over TLS protocol which encrypts DNS queries and responses, thereby preventing third-party access to sensitive information.
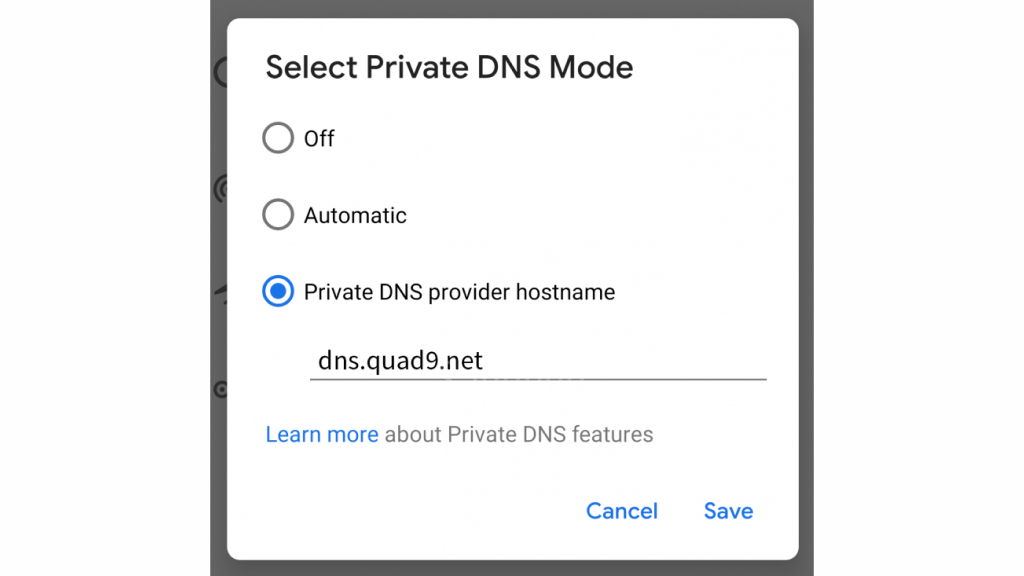
Configuring Private DNS settings on Android is a straightforward process. Open the ‘Settings’ app, select ‘Network and internet,’ then ‘Private DNS.’ Choose a Private DNS provider from the list or input a custom hostname. Voila! Your device has now been configured with Private DNS.
In addition to enhancing privacy and security, using Private DNS on Android devices has various benefits such as faster, more reliable connection speeds, and protection against DNS spoofing attacks.
Android DNS over TLS
The DNS over TLS protocol is supported on Android devices running Android 9 and above. When this protocol is enabled, all DNS queries and responses are encrypted, providing an additional layer of security for users. To enable this feature, simply configure Private DNS settings on your device and select a DNS provider that supports DNS over TLS.
Android DNS Encryption
Android Private DNS provides an encrypted connection between your device and the DNS server, protecting your browsing activity from unauthorized access. Encryption is achieved through protocols such as DNS over TLS. By utilizing Private DNS and encryption methods, users can enjoy a safer, more secure browsing experience on their Android devices.
Activating Android Private DNS
Android Private DNS provides enhanced privacy and security on your device, and activating it is straightforward. Just follow these simple steps:
- Open the Settings app on your Android device.
- Scroll down to the “Network & internet” section and tap on it.
- Tap on “Private DNS”.
- Select “Private DNS provider hostname”.
- Enter the hostname of your preferred private DNS provider (e.g. dns.adguard.com) and tap “Save”.
- You will receive a message indicating that your device is communicating securely with the private DNS provider. You can now exit the Settings app.
That’s it! You have successfully enabled Android Private DNS on your device and can enjoy enhanced privacy and security while browsing the web.
Troubleshooting Android Private DNS
While Android Private DNS is designed to enhance security and privacy on Android devices, technical issues can arise. Here are some common problems you may encounter and how to troubleshoot them:
Private DNS not working on Android
If your private DNS settings are not working properly on your Android device, try the following:
- Check your internet connection to ensure it is stable and strong.
- Verify that the private DNS server you have selected is active and has not been disrupted.
- Restart your device and try activating private DNS settings again.
- Try configuring different private DNS settings to determine if the issue persists.
Troubleshooting Android Private DNS
If you encounter other issues related to Android Private DNS, such as connectivity or compatibility errors, there may be several potential causes:
- Check for software updates to ensure your device is running the latest version of Android.
- Make sure that your private DNS service is compatible with your Android device and version.
- Verify that your firewall or security software is not blocking private DNS traffic.
- Reset your network settings and try configuring private DNS again.
By following these troubleshooting tips, you can resolve common Android Private DNS issues and ensure that your device is secure and private.
Explore Third-Party Android Private DNS Apps and Services
While Android devices come with built-in support for Private DNS, users may opt to use third-party apps for added features and flexibility. These apps offer a range of benefits, from bypassing internet censorship to improving web page loading speeds.
Best Android Private DNS Apps
- Blokada: Blokada is a reliable app that blocks ads and protects user privacy. Its Private DNS feature allows users to avoid censorship and improve internet speed. Blokada is open-source and completely free.
- Adguard: Adguard is an ad-blocking app that also provides Private DNS services for enhanced privacy and security. It has customizable filters and offers a range of features, including malware protection and parental controls.
- DNS66: DNS66 is a free, open-source app that blocks ads and improves internet speeds using Private DNS services. It also includes customizable filters and allows users to add custom blocklists.
Private DNS Services for Android
Aside from apps, there are also various private DNS services available for Android devices. Here are some of the most reliable and secure options:
- Cloudflare: Cloudflare is a popular and trusted DNS service that offers fast speeds, advanced security features, and simple setup. It has a user-friendly app and is free to use.
- Quad9: Quad9 is a non-profit DNS service that prioritizes privacy and security. It uses threat intelligence to block malicious sites and is free to use. Quad9 has a simple setup process, but no app is available.
- OpenDNS: OpenDNS is a Cisco-powered DNS service that offers content filtering, malware protection, and parental controls. It has a user-friendly app and is free to use for personal use, with paid options for business users.
When choosing a third-party Android Private DNS app or service, it is important to ensure that it is trustworthy and reliable. Opt for apps and services that have good reviews and a strong reputation for privacy and security.
Best Practices for Android Private DNS
Maximizing the effectiveness of Android Private DNS involves a few best practices that can enhance your device’s security and privacy. Here are some tips to optimize your experience:
Select a Trustworthy DNS Service Provider
When choosing a DNS service provider, it is essential to select a reliable and trustworthy option. Research the provider’s reputation, policies, and encryption methods to ensure your data is secure.
Optimize DNS Settings for Improved Performance
You can optimize your Private DNS settings by selecting a provider with low latency, reducing network congestion and improving performance. You can also experiment with different DNS server addresses to find the most effective option for your device.
Stay Up-to-Date with Security Updates
It is critical to keep your device and apps up to date to ensure optimum security. Software updates often include security patches and bug fixes that enhance your device’s performance and reduce the likelihood of security threats.
Conclusion
In conclusion, enabling Android Private DNS is a crucial step towards safeguarding your online privacy and security. By encrypting your DNS traffic, Private DNS prevents your ISP or other third-parties from accessing your browsing history or injecting unwanted ads or malware.
We have explored the basics of Android Private DNS, its workings, and the steps required to activate it on your device. We have also discussed some common issues that users may encounter and provided troubleshooting tips to resolve them.
Additionally, we have highlighted the availability of third-party Private DNS apps and recommended reliable service providers for Android devices. It is crucial to prioritize your online privacy and security by following best practices such as selecting trustworthy DNS service providers and staying current with security updates.
Overall, we encourage readers to take advantage of the benefits of Android Private DNS by exploring the various options and implementing the best practices discussed in this article. By doing so, you can feel confident in your online browsing and protect your data from unwanted access or tampering.
FAQ
What is Android Private DNS?
Android Private DNS is a feature that allows users to encrypt their DNS queries, enhancing privacy and security while browsing the internet on Android devices.
How do I activate Android Private DNS?
To activate Android Private DNS, go to your device’s settings menu, navigate to the network settings, and find the option to configure private DNS. Enter the DNS server address provided by your DNS service provider, and enable the private DNS feature.
What are the benefits of using Android Private DNS?
Android Private DNS offers several benefits, including encrypted DNS queries that prevent third-party tracking, improved security by protecting against DNS spoofing attacks, and the ability to bypass censorship and access geo-restricted content.
How can I troubleshoot Android Private DNS issues?
If you are experiencing issues with Android Private DNS, check your internet connection, ensure that the DNS server address is correct, and try switching to a different DNS service provider. You can also clear your DNS cache or restart your device to resolve any temporary issues.
Are there any third-party Android Private DNS apps available?
Yes, there are various third-party Android Private DNS apps available on the market. These apps offer additional features and customization options for managing private DNS settings on your Android device. Some popular examples include DNS Changer, Nebulo, and 1.1.1.1: Faster & Safer Internet.
What are the best practices for maximizing the effectiveness of Android Private DNS?
To optimize Android Private DNS, choose a reliable and trustworthy DNS service provider, regularly update your device’s operating system and apps, monitor your DNS logs for any suspicious activity, and consider additional security measures such as using a virtual private network (VPN).


